
In this webinar, we dive deep into Microsoft’s transformative AI technology and show you how to create custom AI assistants tailored to your unique business needs.
Blogs
Archive for the ‘Uncategorized’ Category

Setting up High Availability and Disaster Recovery for Enterprise Applications
Learn how to ensure business continuity, minimize downtime, and protect your critical systems with best practices for HA and DR.

Analytics Unplugged: From Raw Data to Actionable Insights
Dive into the world of Data Analytics and discover how to harness the power of data for smarter decisions and innovative solutions.
Overcoming Cloud Migration Challenges
Cloud migration offers numerous benefits, but it also comes with its own fair share of challenges Delve into the most common challenges faced in cloud migration.

Rescuing Important Emails from the Junk Folder with Microsoft Graph API
Introduction: Because, Of Course, It Had to Be the CEO
Let me paint you a picture: we were managing the Microsoft 365 environment for one of our long-time customers, let’s call them Company A. We had everything running smoothly—mailboxes organized, Teams working like a charm, and security policies in place. You know, the usual IT perfection (or at least close enough!). Then, out of nowhere, Company A gets bought by Company B—another company that was also using Microsoft 365 but on a completely different tenant. I mean, what’s better than managing one tenant? Managing two, of course! 🙄
The plan was simple: assess the current environment, plan the migration, and move over a few hundred—okay, maybe a few thousand—users from Tenant A to Tenant B. Easy, right? Well, it would have been if the CEO of Company B (now CEO of both companies) hadn’t decided to send a heartfelt, company-wide welcome email to all employees from Company A. You know, one of those, “Welcome to the family, let’s make magic happen together” emails.
Sounds nice, right? Except that for some reason, this email didn’t land in everyone’s inbox. Oh no, it decided to take a detour straight into the junk folder of several employees in Tenant A. And of course, it couldn’t be just anyone. Nope—it’s always the CEO, CFO, or some other high-level executive who faces this kind of issue. Why is it always the top brass? I’m convinced it’s the universe’s way of keeping us humble
So there we were, tasked with quietly and efficiently moving the CEO’s email out of the junk folder and into the inbox—without raising any eyebrows, of course. No one needs to know that the new CEO’s warm welcome was rejected by the company’s spam filter
That’s where the Microsoft Graph API comes in to save the day (and our sanity). In this blog, I’m going to walk you through how we used the Graph API to find those misplaced emails and move them to the inbox, all without anyone even noticing. You’ll get code samples, tips, and maybe a few laughs along the way—because, let’s be honest, if we can’t laugh at our IT woes, what else can we do?
Stick around, and I’ll show you how to become the email-moving ninja your CEO desperately needs. Ready? Let’s dive in!
What You’ll Need to Become an Email-Rescuing Ninja
Alright, let’s get into the nitty-gritty of how we’re going to rescue those poor, misplaced emails from the junk folder using the Microsoft Graph API. Before we start flipping bits and bytes, here’s what we’ll be doing (and don’t worry, I’ll walk you through it step by step—funny analogies included).
Step 1: Authenticating with the Graph API (Because We Need the Keys to the Castle Before We Can Move Anything Around)
Before we can start shuffling emails from the junk folder to the inbox, we need permission. Think of it like trying to get into a fancy club—you need to show your VIP pass at the door. In our case, that VIP pass is the OAuth2 access token, which lets us call the Microsoft Graph API to interact with users’ mailboxes.
In this step, we’ll be:
- Setting up app registration in Azure AD (because no API wants to talk to just anyone).
- Getting the appropriate permissions to read and write emails using the Mail. ReadWrite scope.
- Generating our access token, which is like getting the master key to every user’s mailbox. (Don’t worry, we’ll be responsible with this power. It’s not like we’re looking for juicy gossip or anything.)
Step 2: Searching for Those Sneaky Emails in the Junk Folder
Once we’ve got our access token (a.k.a. the keys to the castle), it’s time to go email hunting. The good news is, the Graph API is like a professional detective—it’ll help us track down those misplaced CEO emails that thought they could hide in the junk folder.
We’ll use the API to:
- Search through the JunkEmail folder for emails with specific subjects, senders, or time frames (in this case, our poor CEO’s welcome message).
- Get the email IDs of the junked messages so we know exactly which ones to move.
Think of it like finding that one sock that always goes missing after laundry day. You know it’s there somewhere, hiding in plain sight.
Step 3: Moving Emails to the Inbox—Where They Belong (Like Putting Socks in the SockDrawer After Laundry Day)
Now that we’ve found the elusive CEO email in the junk folder, it’s time to move it where it rightfully belongs—the inbox. This is the digital equivalent of putting socks back in the sock drawer after laundry day. It’s a simple act, but one that makes all the difference in avoiding chaos. 😅
In this step, we’ll:
- Use the Graph API’s move endpoint to relocate the emails from the junk folder to the inbox.
- Make sure everything is neatly organized in its proper place—no more important
emails getting flagged as junk
Step 4: Doing All This Without Tipping Off the Users (Stealth Mode: Activated!)
Finally, we’ve got to make sure all this happens without anyone noticing. No one needs to know that their brand-new CEO’s heartfelt welcome email was considered digital garbage by the spam filter. We’ll move the emails in stealth mode—silent, efficient, and completely under the radar
In this step, we’ll:
- Ensure the users aren’t alerted by unnecessary notifications.
- Keep everything quiet, like a ninja slipping into the shadows after a job well done.
Because the last thing you want is for someone to ask, “Hey, why did the CEO’s email land in junk?”
Step 1: Authenticating with the Graph API (Because No Ninja Gets into the Castle Without the Right Keys)
Alright, warriors, the first step of our mission is to secure access to the Graph API—this is your golden ticket to all the inbox-saving power. But, like any good ninja, we don’t just barge in through the front door. We need to sneak in the right way by grabbing an OAuth2 token that’ll let us call the Graph API like pros. Ready to get your key to the castle? Let’s break it down:
Step 1.1: Registering Your App in Azure AD (The Secret Entrance)
To get started, you need to register your app in Azure Active Directory. This is where we create a stealthy identity for our app, which we’ll use to request the magical token that gives us access.
- Head over to the Azure Portal and sign in.
- In the left-hand menu, click Azure Active Directory.
- Go to App Registrations and hit New Registration.
- Give your app a name (something cool like “NinjaEmailMover”).
- Under Supported account types, select Accounts in this organizational directory only (if you’re only working within your organization).
- For the Redirect URI, choose Public client/native and enter https://login.microsoftonline.com/common/oauth2/nativeclient.
- Click Register, and boom—you’ve just created the app that will let you perform your ninja magic
Step 1.2: Granting Permissions to the App (Power Up)
Now that we’ve registered the app, we need to give it the right
permissions
to read and move emails. Because without the right permissions, our ninja tools are pretty much useless.
- In your newly created app, go to API Permissions.
- Click Add a permission, then choose Microsoft Graph.
- Select Delegated Permissions and check the following:
-
- > Mail.ReadWrite (Allows your app to read and move emails)
- > User.Read (This one’s default, and it’s just to read basic user profile info)
-
- Once you’ve added the permissions, click Grant admin consent to give your app the green light to actually use them.
Now your app has the power it needs to read and move emails. Pretty cool, right? 🔥
Step 1.3: Creating a Client Secret (Your Ninja Tool)
Next up, we need to create a Client Secret. This is like your app’s katana—it’ll let you authenticate and request access tokens when you call the Graph API.
- Go to Certificates & Secrets in your app’s settings.
- Click New client secret.
- Give it a description (like “NinjaSecret”) and choose an expiration time.
- Click Add.
- Important: Copy the secret value and store it somewhere safe (not on a Post-it note!). You’ll need it to authenticate your app, and you won’t be able to see it again after you leave this page.
Step 1.4: Store That Token Securely (Guard It Like a True Ninja)
Your token is your pass to the API, and just like any secret tool in your ninja arsenal, you need to protect it. This token is typically valid for 60 minutes, so make sure you refresh
it before it expires.
What This Script Does?
What This Script Does?
- Authenticate: It first grabs an OAuth2 access token so we can communicate with the Microsoft Graph API.
- Search the Junk Folder: For each user, the script will search the Junk Email folder for emails matching a specific subject.
- Move Emails: If the email is found, it will be copied (moved) to the user’s inbox.
- Log Progress: We’ll get live feedback from the script on whether emails were found and moved successfully or not.
Step 1: Authentication (Because We Need Permission to Move Stuff)
Before we start rummaging through users’ junk folders, we need to authenticate with the Graph API. This is done using OAuth2, and the script will request an access token by passing in the ClientID, TenantID, and ClientSecret of our Azure AD app.
Here’s the function that handles this for us:
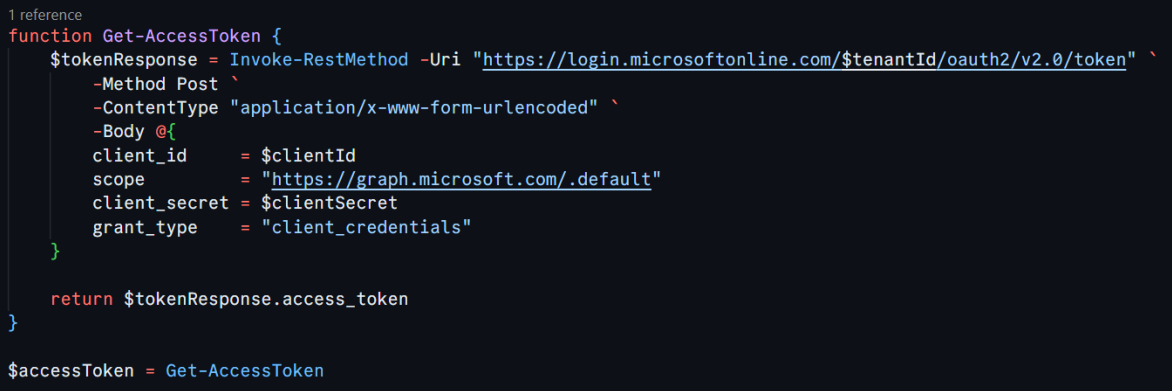
This function sends a request to Azure AD, asking for a token that gives us permission to access users’ mailboxes. You’ll need to replace , , and with your actual values from your Azure AD app registration. This token is our “all-access pass” to the Graph API. Fun fact: Getting this token feels like having the master key to the building…except this key only opens inboxes and junk folders. 🗝️
Step 2: Reading User Emails from a File (Bulk Operations for the Win)
To avoid manually specifying each user, this script reads a list of users from a text file. Each email in the file will be processed in turn. Here’s how we grab that list of users:

Each user’s email address should be listed on a new line in the text file. The script will iterate over this list and handle junk email detection for each user. It’s a nice bulk operation—no need to handle one user at a time.
Step 3: Searching for Emails in the Junk Folder (Ninja Radar On)
Now, for each user in our list, we’ll search their JunkEmail folder for any messages that match the specified subject. We’re using the Microsoft Graph API to do this

This part of the script constructs the Graph API URL that targets the JunkEmail folder for a particular user ($userEmail). The ?$filter=subject eq ‘$emailSubject’ part filters the emails to only those matching the subject you specify.
It’s like being a ninja detective, scanning for emails that don’t belong in the shadows of the junk folder. 🥷📧
Step 4: Moving the Email to the Inbox (Time to Strike)
Once we’ve located the email in the junk folder, we need to move it to the inbox where it belongs. Here’s how we do that:
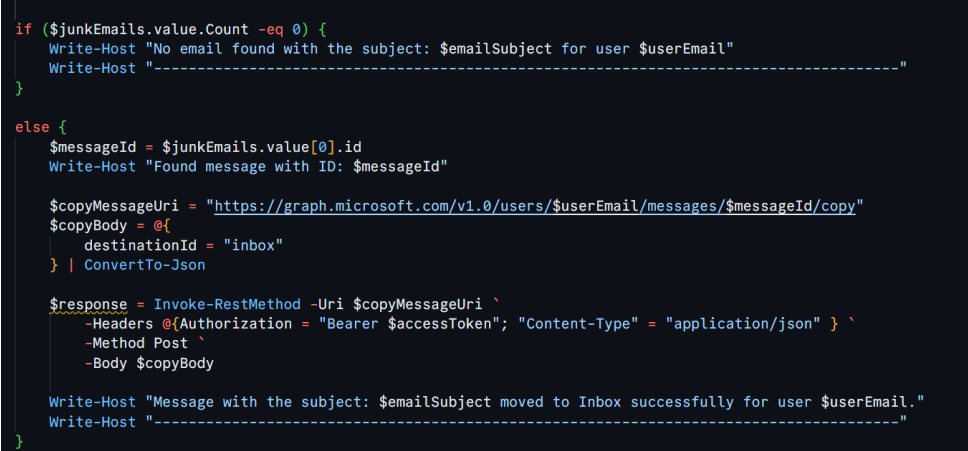
Here’s what happens in this block:
- First, we check if any matching emails were found in the junk folder ($junkEmails.value.Count -eq 0).
- If no email is found, the script logs a message and moves on to the next user.
- If an email is found, we extract the message ID and construct the API call to move (copy) it to the inbox.
- The destinationId = “inbox” specifies where the email will be moved.
Step 5: Logging the Results (Because Feedback is Key)
The script gives you live feedback about whether it found an email and successfully moved it. This way, you can monitor what’s happening and make sure the operation runs smoothly. You’ll know exactly what’s going on, and you can intervene if something looks off.
Wrapping It Up: Ninja Level 100 Achieved!
And there you have it! With just a few lines of PowerShell and the power of the Microsoft Graph API, you’ve become a master of email movement, whisking important messages out of the junk folder and into the inbox—all without breaking a sweat.
This script is especially handy if you’re managing multiple users and don’t want to dig through each junk folder manually. Now, you can let PowerShell and the Graph API do the heavy lifting while you take the credit for saving the day.
So next time a CEO’s email ends up in the junk folder, you’ll be ready. Just don’t forget to add this to your IT ninja toolbox! 🥷✨
Have any questions or issues? Drop them in the comments below, and let’s troubleshoot together!

Cloud Adoption Challenges
Tune in for a deep dive into overcoming hurdles in cloud adoption using real-world solutions from our co-founder, Vineet Arora.
Planning Your Legacy Application Migration to Containers
This blog post is in continuation to “Why Migrate Legacy Applications to Containers and What are the Challenges this Brings?” where we dove into the transformative world of containerization and learnt why migrating your legacy applications to containers not only future-proofs your infrastructure but also enhances scalability, efficiency, and consistency.
In this part, unravel the complexities of planning a successful migration to containers. From assessing your applications to choosing the right tools, get expert insights into each step of the planning phase.
The migration starts with an assessment of existing applications. It is a very exploratory venture. This step is really key, as it tells which applications are going to be the best fit for containerization and which are likely to need too much alteration. Here’s the process of conducting this assessment:
• Application Inventory: Inventory of all applications and services that are running in the current environment. The inventory should be covering the software details, version of the software, underlining infrastructure, dependencies, and usage statistics.
• Dependency Mapping: Create detailed dependency maps for each application, including libraries, external services, and data stores they communicate with. Define and create such relations in a container environment using a tool like Docker Compose.
• Identify Probable Candidates for Challenges: Search for anything that can act as a hindrance to your migration, such as tightly coupled components, stateful applications, or compliance requirements that might drive what applications need re-architecture or migrate first.
Choosing the Right Tools
In considering a transition to containers, some really key things are identified in terms of the tools and platforms. Docker and Kubernetes are the most popular, but they carry different purposes:
• Docker: This is an accompanying tool in running containers, which empowers users to create, deploy, and run them using simple commands and a Dockerfile. In controlling the lifecycle of the container and developing a container-based application in a local environment, Docker would be perfect.
• Kubernetes: While Docker orchestrates at an individual container level, Kubernetes does orchestration of containers at a larger scale. It does deployment, scaling, and management of containerized applications across clusters of machines. It has come out with all the prominence and importance in today’s production environments that call for high availability, escalation, and load balancing.
When choosing tools, consider:
• Compatibility: Ensure the tools integrate well with your existing CI/CD pipelines and development workflows.
• Scalability: Always go for tooling that will scale with the demands of your application. For example: In case your deployment is of large scale, then Kubernetes is a brilliant tool for that.
• Community Support: Prefer options that have strong community support and documentation, if available and reflect reliability and long-term viability.
Strategies for a Smooth Migration
Approaching migration with a structured strategy can greatly enhance the process:
• Start Small: Make sure to use the lowest criticality or simpler applications first. This will enable you to both manage your risks and learn from the process without impacting major systems.
• Pilot Projects: Pilot migration projects provide valuable feedback. Choose a project characteristic for a typical application within an organization but carrying no significant business risk.
• Gradual scale-up: After your pilot project is successful, you can start to scale up your migration efforts very gradually. Learn from your mission-critical and more complex applications’ mistakes.
• Consider refactoring: Some applications may need refactoring before being containerized. For example, refactoring can mean that one would split a monolithic application into a set of microservices or make an application stateless if possible.
Ensuring your team is container-ready is as important as the technical migration aspects. Provide training to upskill the existing team on resources available over the internet on container technologies and Kubernetes. For example, there are a number of online platforms providing courses related to this from introductory to an expert level.
Of course, this would be very strategic to bring in an external organization to help in the shifting of legacy applications to containers. This brings out a number of advantages that would help in smoothening the process, reducing the risks, and realizing more benefits from the move into a containerized environment. Here are some compelling reasons and advantages for enlisting external expertise:
Access to Specialized Knowledge and Experience:
Expertise: Providing years of expertise around container technologies and their migration to success across many industries. They bring experience
involving best practices and potential pitfalls your migration can be involved in.
Stay Abreast with Technology: That’s the sure deal that your solutions are in line with advancements in technology, such as new developments in
containerization and orchestration tools like Docker and Kubernetes. In essence, you will be able to implement the best and efficient state-of-the-art
solutions.
Enhanced Focus on Core Business Activities:
• Resource Allocation: Outsourcing ensures that most of the technical complexities involved in the migration are offloaded; this enables your
internal teams to remain focused on the core business functions rather than drift into the many demands of a complex migration project.
• Reduced Learning Curve: Your staff does not need a couple of days or weeks to train in order to be up-to-date with container technology. The outsourced team will help fill the skills gap and assist your business in adaptation to new technologies much quicker and more productively.
Risk Mitigation:
• Tried-and-Tested Methodologies: This would mean that, while the provider’s internal team might have much more knowledge of an organization’s IT setup, they would use proven methodologies—developed over many projects—as a much better insurance policy against risks
• Unchanging support: They provide unchanging support and maintenance post-migration, which helps in very quickly getting issues resolved and making iterative improvements to the infrastructure.
Cost Efficiency:
• Predictable Spending: The cost of outsource teams may be lower than developing an internal team, for there would be added costs from the companies involving recruitment, training, and the retention of services from experienced IT practitioners.
• Scalability: The outer crew can increase their services according to your project needs. This is much more flexible in comparison to hiring employees on a full-time basis, and therefore, much better budget control is allowed.
Accelerated Migration Timeline:
• Faster Timeframe: Having expert external teams with relevant experience and resources will make a huge difference to the timeframe it takes to
complete the migration. This will be enabled by the tools and processes they have, making it easy to transfer the applications with minimal disturbances from the day-to-day operations.
• Immediate impact: from improved scalability, better efficiency, and improved operational flexibility, these benefits of the rapid deployment bring the
containerization in the organization’s life sooner than later.
Objective Assessment and Customization
• Unbiased Recommendations: Get the unbiased recommendations for your IT infrastructure or those even changes that your team may overlook.
• Solutions Tailored for You: They bring their knowledge of serving the tailored solutions that fit differing organizational needs and constraints to perfection. So, the migration strategy aligns spot-on with your business goals.
At Mismo Systems, we understand that migrating your legacy applications to containers can seem daunting. That’s why our team of experienced engineers is dedicated to simplifying your transition, ensuring a smooth and efficient migration process. With our expertise, you can unlock the full potential of containerization to enhance scalability, efficiency, and deployment speed.
Why Choose Mismo Systems?
• Expert Guidance: Our seasoned engineers guide you through the entire migration process, from initial assessment to full-scale deployment, ensuring your business achieves its strategic goals with minimal disruption.
• Customized Solutions: At Mismo Systems, we don’t believe in one-size-fits-all answers. We create tailored solutions that fit the unique needs of your business and maximize your investment in container technology.
• Ongoing Support: Post-migration, our support team is here to help you manage your new containerized environment, from optimizing performance to implementing the latest security protocols.
If you’re ready to transform your legacy applications with containers, Mismo Systems is your go-to partner. Contact us today to learn more about how we can lead your business into the future of technology.
At this point, you should have a pretty good foundation under you for planning your migration to containers. Remember that the steps above will help ensure that you are not just transitioning properly but in a manner that is sustainable.

DevOps with AWS
What is CI CD?
Continuous Integration
Developers work on the code which is stored in a code repository. Code repository can be GitHub, AWS CodeCommit etc. As developers keep making changes to the code and push to the code repository, a build server builds the code and runs the tests. Build Server can be AWS CodeBuild, Jenkins etc.
This process is called continuous integration. Developers focus on developing code and not building and running tests. It helps to identify and fix bugs faster and have code available for frequent releases.
Continuous Delivery and Deployment
With Continuous integration, you have automated the code build and testing. The next step is to deploy the code. For this, you can use a deployment server which can be AWS CodeDeploy, Jenkins etc. The deployment server will take the code from the build server and push the code to the test/prod environment.
With Continuous delivery, you will have a manual step to approve the deployment. The deployment will be automated and repeatable. With Continuous deployment, no manual steps are required, and deployment will be fully automated.
In practical scenarios, continuous deployment can be used to push the deployment to test & UAT servers while manual approval can be used for production deployment.
Also Read:- Breakout Rooms and Its Usage – Microsoft Teams
AWS Technology Stack for CI CD
Code Commit can be used as a private code repository for version control for collaboration, backup and audit. It includes all the benefits of AWS i.e., Scale, Security, Compliance and integration with other services including AWS Code Build, Jenkins etc. You can use GIT to integrate your local repository with the Code Commit repository. You can configure role-based access, notifications and triggers. For e.g. You can configure a trigger to execute a lambda function for automation.
Code Build A fully managed build service can be an alternative to tools like Jenkins. It has all the benefits of a managed service i.e., scale, security and no maintenance overhead and power of integration with services like Cloud Watch for notifications & alerts and Lambda for automation. It uses Docker containers under the hood (you can use your own docker image as well), is serverless and pure Pay as You Go (PAYG).
Code Deploy managed service by AWS is to deploy code on EC2 instances or on-premises machines. Code deploy can be used instead of tools like terraform, ansible etc. if it meets your requirement of continuous deployment. You can group the environment such as prod, dev etc. Code deploy will not provide resources for you. Code deploy agent will be running on the server/EC2 instance and will perform the deployment.
Code Pipeline to orchestrate the whole deployment. It supports code repositories such as GitHub, Code Commit, build tools such as Code Build, Jenkins, deployment tools such as Code Deploy, Terraform, and load testing tools. It creates artefacts for each stage.
All these services can easily use powerful management and monitoring tools like CloudWatch for logging and monitoring.
Major Cloud Concerns – Do corporate agents, cyber hackers, and governments have access to my data if it is in the cloud?
This is one of the major cloud concerns for many companies, but it is irrational. Your IT team manages access, sets rights and restrictions, and provides smartphone access and options & your corporation remains the sole owner of the venture. You maintain your rights, title, and interest in the data contained in Office 365.
When safeguarding your data, we operate under several key principles:
- We may not use your data for advertising purposes or for any reason other than supporting you with services that you have paid for.
- If you want to change providers, you will be taking your data with you.
- Privacy controls enable you to configure who has access to and what they can access in your company.
- Extensive auditing and monitoring avoid admins from getting inappropriate access to your files.
- Customer Lockbox for Office 365 leaves customers with clear power in unusual cases where a Microsoft developer could perhaps need to access customer data to tackle an IT problem.
Strict safeguards and architecture elements preclude your data from mingling with those of other organizations, and our data centre workers will never have unprivileged access to your data which is one of the major cloud concerns.
The standard establishes a uniform, international approach to protecting privacy for personal data stored in the cloud. It reinforces that:
• You are in control of your data.
• You are aware of what is happening with your data.
• We provide strong security protection for your data.
• Your data will not be used for advertising.
• Microsoft encourages government inquiries to be made directly to you unless legally prohibited and will challenge attempts to prohibit disclosure in court.
Follow us on Quora for Cloud related queries!

Top 10 Elements of The Cloud
In this blog I will be talking about the Top 10 elements of Cloud.
Virtual Network: Create a logically isolated section in Microsoft Azure and securely connect it outward.
VM: Windows Azure Virtual Machines is a scalable, on-demand IaaS platform you can use to quickly provision and deploy server workloads into the cloud. Once deployed, you can then configure, manage, and monitor those virtual machines, load-balance traffic between them.
Azure Storage: Microsoft Azure Storage is a Microsoft-managed cloud service that provides storage that is highly available, secure, durable, scalable, and redundant.
Load Balancer: A load balancer that distributes incoming traffic among backend virtual machine instances.
Azure Traffic Manager: Microsoft Azure Traffic Manager allows you to control the distribution of user traffic for service endpoints in the different datacentre.
Application Gateway: Scalable layer-7 load balancer offering various traffic routing rules and SSL termination for the backend.
Business continuity and disaster recovery (BCDR): BCDR plan is a plan to keep your data safe, and apps/workloads running when planned and unplanned outages occur.
Azure Active Directory: (Azure AD) is Microsoft’s Cloud-Based identity and access management service, which helps your employees sign in and access.
Azure Backup: Simple and reliable server backup to the cloud.
Reliable off site data
a) Convenient offsite protection
b) Safe data
c) Encrypted backups
A simple and integrated solution
a) Familiar interface
b) Windows Azure integration
Efficient backup and recovery
a) Efficient use of bandwidth and storage
b) Flexible configuration
c) Flexibility in recovery
d) Cost-effective and metered by usage
Content Delivery Network (CDN) is a distributed computing model designed for developers to stream high-bandwidth files faster, efficiently, and reliably to worldwide customers. Azure CDN is typically used for delivering static content such as Images, Videos, Style sheets, documents, files, Client-side scripts, and HTML pages to customers using servers that are closest to users.
App Service Plan: App Service plans to represent the collection of physical resources used to host your apps.
Azure Web Apps: Azure Web Apps enables you to build and host web applications in the programming language of your choice without managing infrastructure.
Azure SQL: A relational database-as-a-service, fully managed by Microsoft. Delivers predictable performance, elastic scale, business continuity, and programmatic functionality. For cloud-designed apps when near-zero administration and enterprise-grade capabilities are key.
Thanks for reading!